Have you always been fascinated by photography but found the whole thing to be a little too daunting? Have you always been “clicking an auto” but want to learn the finer details of functions? Well, worry not as we’re going to simplify all the technical keywords that comes with having to operate a camera, so that all you have to do is dial in the settings and shoot.
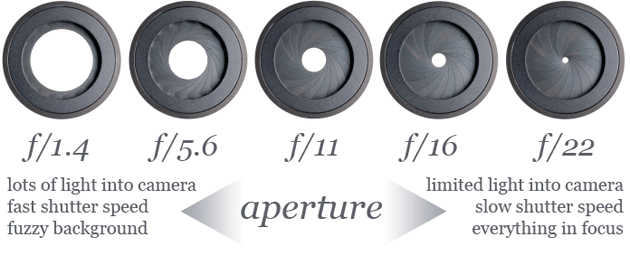
Aperture: Aperture is the term that refers to a circular curtain inside the lens which determines just how much light goes into your camera. An aperture values signifies just how much the curtain opens and is measured in fractions. Therefore, a bigger fraction denoted a bigger opening, eg. ½ is bigger than 1/16. The larger the aperture opens, the more light hits your sensor. Therefore to shoot in low light, a big aperture is a must.
Shutterspeed: Once the light has crossed the aperture, it sort of just sits inside your camera before hitting the sensor. What’s blocking it is another curtain called shutter. The shutter decides for how long all this light that has entered your camera will hit the sensor. Allow it too much time and your image will start turning white and allow it too little time and it will be too dark. The duration for which the shutter is open is measured in fractions as well, unless you are doing a long exposure of several secs/mins/hours.
ISO: The ISO on your camera determines just how sensitive your sensor is to light. The higher the ISO, the more sensitive it is, meaning it needs lesser light to create an image. This, however, does not mean that you can crank the ISO setting all the way to the highest, as there are a few downsides to using High ISO.
Light Meter: A light meter is a little module that measures the amount of light coming into camera and factors all the conditions to generate a “good” exposure based on preset parameters. This is what tells you how much shutter speed and aperture values to use. Unfortunately, the light meter is not always a 100% accurate, so always review your images after shooting and if they look over or under exposed, do use exposure compensation.
By Kathy Eyster
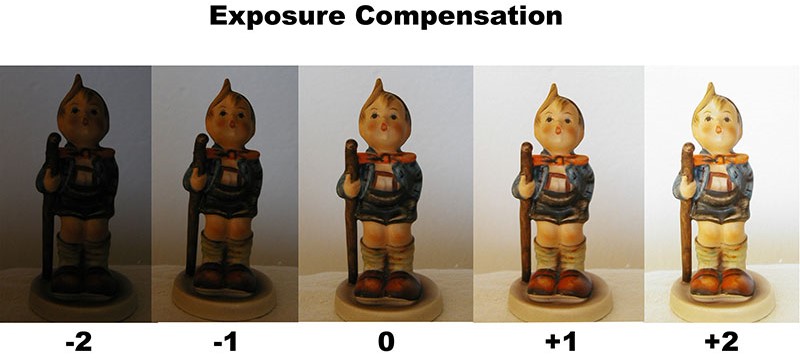
Exposure Compensation: Exposure compensation is the method where you expose a little longer or for a shorter duration than what your light meter says should be the right setting. This can occur when you shoot at the light meter recommended settings and your exposure Is either over or under exposure. So you can do positive exposure compensation (to increase exposure) or use negative exposure compensation (to underexpose). You’d ideally use exposure compensation as a quick fix to your exposure problems, without having to change the shutter speed or aperture.
Depth of Field: The Depth of Field (DoF) of a particular photograph essentially refers to the area in front and behind your intended point of focus. The more the depth of field, the more you will have in focus in your image and smaller the depth of field, the more background (and foreground) blur you will get. Macro shots tend to have a “shallow” depth of field, while group shots must have a great depth of field.
Bracketing Shots: Bracketing is a method where the camera can take a number of shots simultaneously at different exposure values. Normally, this would be a “0” exposure (the value determined by your light meter as ideal) and two (or more even numbered shots) more with an exposure value of a higher and an equally lower value. This is an extremely handy method for shoot High Dynamic Range images. If you are going to buy a new camera device, than don’t forget to check these point of concern that you should keep in mind.
thanks for the help I apreciate it