How To: Edit default location for installing Apps permanently

Fed up of changing the location of directory where your game or application should be installed? Then this solution is for you, as the size of hard drives increase, more people are using partitions to separate and store groups of files.

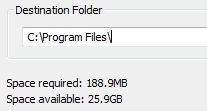
Windows uses the C:\Program Files directory as the default base directory into which new programs are installed. However, you can change the default installation drive and/ or directory by using a Registry hack.

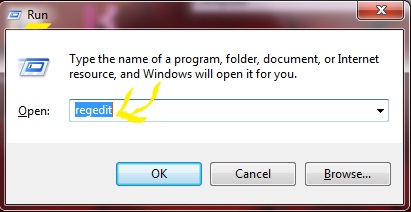
Run the Registry Editor (regedit)and go to

HKEY_LOCAL_MACHINE\SOFTWARE\Microsoft\Windows\CurrentVersion

change-default-installation-dir

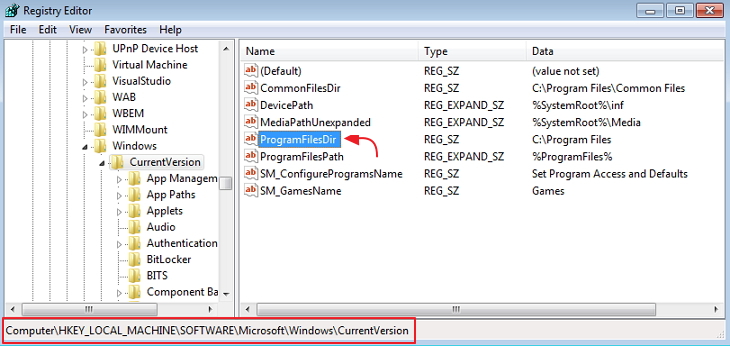
Look for the value named ProgramFilesDir. by default,this value will be C:\Program Files.

change-default-installation-dir

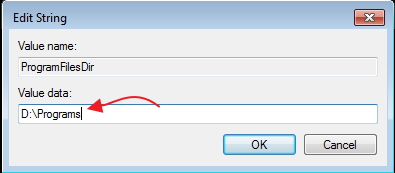
Edit the value to any valid drive or folder and XP will use that new location as the default installation directory for new programs.

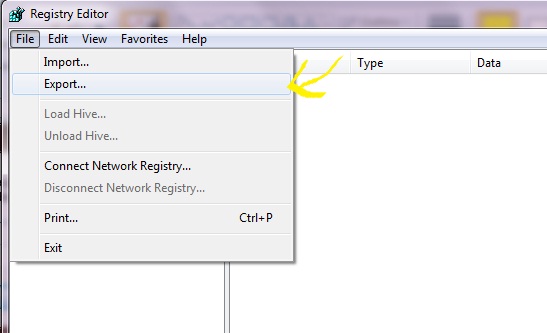
Don’t forget to take backup of registry first in case you messed up.


Create shortcut to modify registry files and add custom context menu

Have you ever wanted to create a shortcut which would speed up your registry editing skills ? or do you modify registry more frequently ? Here is a solution which will perform any task in less than 5 seconds. We will explain this tutorial by adding a custom option in windows Right Click Context Menu of a file. [Not Folder]

  • First, we’d launch Notepad or another text editor.
  • Next add this line at the top of file.

“Windows Registry Editor Version 5.00”

  •  After it add a blank line.
  • To create a key Directory in registry, add full path of it.

[HKEY_CLASSES_ROOT\*\shell\Open with Softnuke\command]

  • Now add name of key and its value in this format “”=”value”, value could be path of any file with which you want to open.

@=”notepad.exe %1”

  • %1 is used here to provide path of the specified file on which Right click is to be done and @ means default key in directory.

registry-shortcut-open-with-softnuke

  • Now save it as “softnuke.reg”. Always Save the file with the .reg file extension. You can double-click it to add the information to your registry.

A single .reg file can contain multiple entries, so you could have one .reg file that installs all your favorite shortcuts.

registry-shortcut-save

Now can use it the way you like, here is another example : Enable/Disable access of USB

Windows Registry Editor Version 5.00 [HKEY_LOCAL_MACHINE\SYSTEM\CurrentControlSet\services\USBSTOR\] “Start”=dword:4
  • Finally, to delete the folder and all its continents create a .reg file similar with (-)minus sign in front of its directory.
Windows Registry Editor Version 5.00 [-HKEY_LOCAL_MACHINE\SYSTEM\CurrentControlSet\services\USBSTOR\] “Start”=-

For any Queries please comment below.

registry-shortcut-context

Note: Users running earlier versions of Windows may want to substitute Windows Registry Editor Version 5.00 with REGEDIT4.

How to Export/Backup Windows Registry

The Windows Registry is a hierarchical database that stores configuration settings and options on Microsoft Windows operating systems. It contains settings for low-level  operating system components as well as the applications running on the platform: the kernel, device drivers, services, SAM, user interface and third party applications all use the registry. The registry also provides a means to access counters for profiling system performance.

Its easy and fast, you can make a backup file for all of your registries stored in OS. You can also select a specific registry to backup if you want to.

Step 1 : Go to Start and enter ‘regedit’ in search bar or press Win+R to open RUN then type regedit and hit enter.

Regedit

(Optional)Step 2 : Windows will ask you to allow executing it, select YES. A new window of Registry Editor will open.

Step 3 : You can see the window is divided into two parts, left one looks like a hierarchy of all registry stored. If you want to backup a specfic one then find it and select it otherwise click My Computer.

Regedit export

Step 4 : Now Go to File >Export. Browse the location where you want to export your backup and click SAVE. It will take 2-3 mins according to your computer specifications to do it so have patience !!.

Step 5: Voila !! and your are Done. Later on if you want to restore Just open back the exported file again by double clicking it.

*You can also explore it by opening through a notepad .