Victorinox Presentation Master : Swiss Army Knife

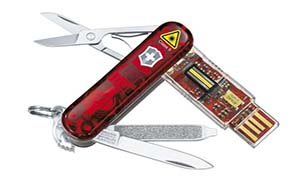
This is one Swiss Army Knife and USB drive combo that is perfect for James Bond. However, if you aren’t the famed MI6 agent, but a salesman who travels a lot and cares an awful lot about your data’s security, you can think of buying the Victorinox Presentation Master, too. Apart from a small knife, nail file and scissors, this Victorinox tool comes with a 32GB USB drive that enjoys AES 256-bit hardware and software encryption. It also supports plug-in-play Powerpoint presentation slides. If your presentation skills don’t blow away your audience, may be the act of plugging in a Swiss army knife into a PC or projector port will.

The explanation for the Presentation Master name is that there’s built-in Bluetooth so you can control PowerPoint presentations with the forward and back buttons. A button on the opposite side controls a handy laser pointer.Write speeds of 5.6MB/s aren’t great, but read speeds of just over 20MB/sec are impressive.

Test Notes

  • Setting up the drive for the first time can be daunting—you’ll have to capture images of all five fingers on one hand and the drive seems a bit finicky about what constitutes a “good” image of the digit—but once you do, it will reliably unlock with a quick finger swipe.
  • The Demolition Man hack—cutting off a finger or an eye—won’t work on this. The fingerprint scanner checks the oxygenation level of the blood flowing through your finger as you swipe. No living tissue, no access.
  • The drive also recognizes brute force attacks—and responds by feigning being cracked, displaying dummy folders filled with innocuous files—as well as increases in voltage or current.
  • The only way I could make this more secure is to handcuff it to my wrist.

The fingerprint reader is a tad fussy. It took about eight tries before our swipe was accepted. Were we done yet? Nope. The software asks for a second, backup fingerprint to be recognized, and it has to be from your other hand. (In case of emergency field amputations, one assumes.) Again it took no less than eight swipes for the print to be accepted.

The final, and possibly most mind blowing feature is an actual self destruct feature. If the drive detects someone trying to hack their way into your files, it will physically blow itself up. Obviously, this doesn’t involve explosives, but the developer of the Swiss Presenter had a unit with him that had deliberately been blown up, and the memory chip really is blow to pieces inside its case.

Victorinox are so confident that they have developed the most secure USB drive in the world, that they were offering a $100,000 prize to anyone that could access the data stored on a drive at their CES booth. As the show came to an end, nobody had succeeded in hacking their way into the drive.

Howto : Use USB Drive as a Hardware key for computer

Windows has an inbuilt system utility called SysKey that can help you use a normal pen drive as an access device instead of a regular text based password. To do this

  • First step is to assign A: as your removable disk drive. This is because the utility was designed to work with floppy drives.

change-drive-letter

  • To do this hit [Window] key and type “disk management” and press enter. Right click the relevant drive name of USB and change drive letter.
  • Now hit the [Window] key again and type Syskey and press Enter.

syskey-store-usb

  • Click update –> Store key on Floppy Disk. Click OK

After this a file called Startkey.key will be created on your pendrive and your PC won’t boot into your desktop unless the pen-drive is plugged into your system.

To revert back , just follow above procedure again and set STORE STARTUP KEY LOCALLY.

How to block access of USB

USB access is something that can affect your computer in a variety of ways. Whether you’re protecting your computer against viruses or malware, or you don’t want anybody to have the ability to copy files onto a USB memory stick, you will need to restrict the access to the USB ports on your system. Setting this up will give your computer the security it needs and keep your data safe.

  • Click “Start” and select “Run.”
  • Type “regedit” into the box and press “Enter.”
  • Look for “HKEY_LOCAL_MACHINE\SYSTEM\CurrentControlSet\Services\UsbStor.”
usb-block
  • Select the “USBSTOR” entry.
  • Right-click on the “Start” file on the right and select “Modify.” Change the value to “4” to deny access to the USB ports.
  • To enable it , just turn back value  to “3”.

You can speedup the process by creating desktop shortcut of this procedure. Learn from here: Create shortcut to modify registry files

Note: You need administrator privileges for this.

How to Encrypt Your Pen Drive

Encrytion on Various Platforms

Encrytion on Windows

There are a variety of Windows-based tools for creating an encrypted volume on a USB stick, but our favorite is the free, open-source FreeOTFE. FreeOTFE uses on-the-fly encryption, which means that data is automatically encrypted and decrypted without you needing to do anything other than enter a password or possess the right keyfile.

To get started, download and install FreeOTFE. Then open the application and select your USB cick on the “New” icon. FreeOTFE will then walk you through the process of setting up your encrypted volume and help you choose an encryption algorithm or set other options.

Once FreeOTFE finishes, your USB stick will contain an encrypted volume where you can store sensative data to keep it safe from prying eyes.

True Crypt

An alternative system is TrueCrypt, although unlike FreeOTFE, this requires you to have administrator rights to even start it on any computer you wish to use your encrypted thumb drive on.

Encryption on Mac OS X

Mac OS X actually has a nice built-in encryption tool you can use right out of the box.

To get started, just plug in your USB stick and open up Disk Utility (you’ll find it in the Utilities folder inside your Applications folder).

In Disk Utility head to File >> New >> Blank Disk Image. Select your USB stick as the destination and choose one of the encryption options. You can also set the size of the volume, number of partitions and the format.

Once that’s done click create and enter a good password .

Alternativly, there is a Mac version of TrueCrypt which may be used.

Cross-Platform Encryption

For accessing data across MS Windows and Windows Mobile PDAs, the previously mentioned FreeOTFEserves as a solid open-source cross-platform option.

For use with Windows, Linux and Mac OS X machines, TrueCrypt can also be used.

How to Unplug USB devices without removing it safely

If you unplug a storage device from your computer while it’s transferring files, there’s a big chance that you lose some information or worst, your USB flash drive might get corrupted. Good thing Windows has a Safely Remove Hardware option which lets you unplug your flash memory safely. However, for most people, they find it very time consuming to go through this step every time they remove their USB from their PC. So if you’re looking for a simple way to enable quick removal of USB devices and bypass Safely Remove Hardware, this post is for you.

How to bypass Safely Remove Hardware option when unplugging USB devices:

1. Open Device Manager. You may find it by searching “Device Manager” in the Start menu search field or in the Control Panel or follow: Right Click My Computer > Properties > Device Manager [Left].

device manager

2. Look for USB Devices/Disk Drives. Click Disk Drives to expand and reveal your internal and external drives. TheUSB devices will always have “USB” included in their names.

device manager

3. Choose Quick Removal. Double-click the USB device for which you want to disable the Safely Remove Hardware option. A new window will open, go to Policies tab. You’ll see two removal policies: Quick Removal and Better Performance. If you choose Better Performance, you will need to use the Safely Remove Hardware option every time you disconnect your USB while the Quick Removal policy lets you disconnect the device safely without using the said option.

Device manager policies